I’ve made a HowTo that will guide you step-by-step through the process of setting up a SuperTuxKart Server on Debian GNU Linux 11. You can find it here.
Tag: howto
automount CIFS share with autofs
This HowTo will prepare a Linux client to automatically mount CIFS shares from a remote Samba server on access/demand. Since I am mounting different filesystems, I have structured my mountpoints as follows:
/
├── home
│   ├── USER
│   │   ├── mnt
│   │   │   ├── cifs
│   │   │   │   ├── smb-server-a.fqdn
│   │   │   │   │   ├── share-a
│   │   │   │   │   ├── share-b
│   │   │   │   │   └── share-c
│   │   │   │   ├── smb-server-b.fqdn
│   │   │   │   │   ├── share-b
│   │   │   │   │   ├── share-b
│   │   │   │   │   └── share-c
│   │   │   ├── sshfs
│   │   │   │   ├── ssh-server-a.fqdn
From here on, I will use “mysambaserver.local” as the Samba servers FQDN, “mysambaserver” as its hostname, “myusername” as my username, “mygroup” as group and “myPassWord” as the password.
At time of writing, the server is running Ubuntu 18.04.4 LTS and the client is running Ubuntu 20.04.1 LTS.
This HowTo got compiled by trial and error and from these sources:
- https://wiki.ubuntuusers.de/Autofs/#Samba-Freigabe
- https://www.elektronik-kompendium.de/sites/raspberry-pi/2102201.htm
- https://wiki.ubuntuusers.de/Samba_Client_cifs/
- https://wiki.ubuntuusers.de/Gigolo/
- https://blog.marvin-menzerath.de/artikel/samba-freigaben-mit-autofs-automatisch-ein-aushaengen/
- https://www.howtoforge.com/accessing_windows_or_samba_shares_using_autofs
- https://wiki.samba.org/index.php/Mounting_samba_shares_from_a_unix_client
- https://kalitut.com/samba-shares-fstab/
Install Required packages, check supported filesystems
Install the required packages on the client (gigolo is just “nice to have”) and check if its kernel supports CIFS.
apt-get install autofs cifs-utils smbclient gigolo gvfs-backends gvfs-fuse fuse
ls -1 /lib/modules/$(uname -r)/kernel/fs | grep "cifs"
cifs
Check remote SAMBA connection
Check remote connection to the Samba server:
smbclient -N -L //<mysambaserver.local>/
        Sharename       Type      Comment

        ---------       ----      -------

        share-a         Disk      Share A

        share-b         Disk      Share B

        share-c         Disk      Share C

        IPC$            IPC       IPC Service (mysambaserver server (Samba, Ubuntu))

SMB1 disabled -- no workgroup available
Check authenticated login
Check an authenticated remote login. If the command line asks for a password, enter the SMB password which is configured for the user at the Samba server (via smbpasswd).
smbclient -U <myusername> -L //<mysambaserver.local>/
Enter WORKGROUP\myusername's password: [myPassWord] <--- enter the password


        Sharename       Type      Comment

        ---------       ----      -------

        share-a         Disk      Share A

        share-b         Disk      Share B

        share-c         Disk      Share C

        IPC$            IPC       IPC Service (mysambaserver server (Samba, Ubuntu))

SMB1 disabled -- no workgroup available
Create mount point
Create the mount point in the users home directory:
mkdir -pv /home/<myusername>/mnt/cifs
chown -R <myusername>:<mygroup> /home/<myusername>/mnt/
autofs configuration
The configuration consists of the master map file (/etc/auto.master), the corresponding map file (/etc/auto.mysambaserver-cifs) and the key file which contains the credentials for authentication.
In the following we will configure autofs to mount shares to /home/<myusername>/mnt/cifs/<mysambaserver.local>/<share-name>.
Map file
Create the mapfile
vim /etc/auto.<mysambaserver>-cifs
#!/bin/bash
# $Id$
# This file must be executable to work! chmod 755!
set -x
KEY="${1}"
# Note: create a cred file for each windows/Samba-Server in your network
#       which requires password authentification.  The file should contain
#       exactly two lines:
#          username=user
#          password=*****
#       Please don't use blank spaces to separate the equal sign from the
#       user account name or password.
CREDFILE="/etc/autofs/keys/${KEY}"
# # !!!!!!!!!!!!!!!!! PAY ATTENTION TO the CIFS VERSION in MOUNTOPTS !!!!!!!!!!!!!!!!!!!!!!!!!!!
# https://www.raspberrypi.org/forums/viewtopic.php?t=201727 # https://www.raspberrypi.org/forums/viewtopic.php?t=211987
# http://krisko210.blogspot.com/2016/06/autofs-automount-nfs-share.html
# Note: Use cifs instead of smbfs:
MOUNTOPTS="-fstype=cifs,file_mode=0644,dir_mode=0755,nounix,uid=1000,gid=1000"
SMBCLIENTOPTS=""
for EACH in /bin /sbin /usr/bin /usr/sbin
do
        if [ -x $EACH/smbclient ]
        then
                SMBCLIENT=$EACH/smbclient
                break
        fi
done
[ -x $SMBCLIENT ] || exit 1
if [ -e "${CREDFILE}" ]
then
        MOUNTOPTS=$MOUNTOPTS",credentials=${CREDFILE}"
        SMBCLIENTOPTS="-A "$CREDFILE
else
        SMBCLIENTOPTS="-N"
fi
$SMBCLIENT $SMBCLIENTOPTS -gL "${KEY}" 2>/dev/null \
   | awk -v key="$KEY" -v opts="${MOUNTOPTS}" -F'|' -- '
        BEGIN   { ORS=""; first=1 }
        /Disk/  { if (first) { print opts; first=0 };
                  gsub(/ /, "\\ ", $2);
                  sub(/\$/, "\\$", $2);
                  print " \\\n\t /" $2, "://" key "/" $2 }
        END     { if (!first) print "\n"; else exit 1 }
        '
chmod 755 /etc/auto.<mysambaserver>-cifs
This file is a slightly modified version of the file auto.smb which usually comes as part of the autofs package. You need to modify the line defining the mountopts above and change userid and groupid to the uid/gid of your personal account.
key file
Now you have to give autofs the credentials needed to access shares on your network. To do this create a key file
mkdir -pv /etc/autofs/keys/
vim /etc/autofs/keys/<mysambaserver.local>
username=<myusername>
password=<myPassWord>
chown root:root /etc/autofs/keys/<mysambaserver.local>
chmod 600 /etc/autofs/keys/<mysambaserver.local>
Master-Map
The maps to be monitored are specified in this file.
Execute the following command to append the line “/home/myusername/mnt/cifs /etc/auto.mysambaserver-cifs –timeout=60” at the end of the /etc/auto.master file:
echo "/home/<myusername>/mnt/cifs /etc/auto.<mysamabaserver>-cifs --timeout=60 --ghost" >>/etc/auto.master
The syntax here is: <Directory> <Map-File> [Parameter]
The shares should be unmounted after an inactivity of 60 seconds (–timeout=60) and empty directories should be created for the individual shares before mounting (–ghost).
Debugging
for debugging output stop the daemon and interactively start autofs with verbose output enabled
service autofs stop
automount -f -v
You can restart autofs with
service autofs start
Test
Use the following command to test if your setup is working
ls -als /home/<myusername>/mnt/cifs/<mysambaserver.fqdn>/<share-name>
pfSense: “Unable to check for updates”
What to do if pfSense says that it is unable to check for updates.
The situation was:
- pfSense was throwing the error message “Unable to check for updates” at the dashboard and at the “Auto Update”-tab.
- traffic to and from the internet was passing through my pfSense-box
- DNS-resolution was working for hosts at the LAN-interface
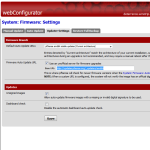
 The first thing which wasn’t correctly configured was the “Updater Settings” under “firmware” – “Updater Settings”-tab. I needed to select the “Firmware Branch” with the drop-down labeled “Default Auto Update URLs”. In my case it’s “pfSense amd64 stable updates (current architecture)” which automatically populates the “Base URL” in the “Firmware Auto Update URL”-section and also ticks “Use an unofficial server for firmware upgrades” (btw. why unofficial?).
After that, the situation was the same as above, only that I now had the Base URL “http://updates.pfsense.org/_updaters/amd64” in the Update URL text box. In the pfSense-diagnostics my pfSense-box was able to ping and traceroute “updates.pfsense.org”. I’ve been able to resolve and browse that URL from a PC behind the LAN-interface but pfSense was still complaining that it is “Unable to check for updates” at the dashboard and at the “Auto Update”-tab.
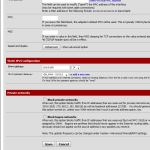
 Then I have corrected another issue at the WAN-interface configuration. Since my pfSense-box is sitting between a FritzBox and my local networks, I have unticked “Block private networks” since my gateway is in a private IP-address-range (10.0.0.X/24). I still wonder why my setup was working initially because as I understand this option, it should have blocked traffic from all private IP-ranges. I also have unticked “Block bogon networks” because (in my case) the source will allways be my FritzBox in 10.0.0.X/24.
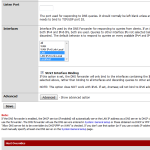
 The root of the problem was hiding in the settings for the DNS-forwarder under “Services” – “DNS-Forwarder”. Since the option “Strict Interface Binding” was selected, I had to select “localhost” under “Interfaces” for that my pfSense-box was able to resolve “updates.pfsense.org”. After that change everything was working fine and I’ve been able to run the “Auto Updater” successfully.


